
Manage Azure Virtual Machines with Power Apps and Azure Resource Manager
- Yash Agarwal

- Nov 19, 2020
- 6 min read
In this #PowerShot, I will show you how to build an app with Power Apps to manage Azure Virtual Machines using the Azure Resource Manager REST API and a custom connector. We will take a look at a setup to interact with the Azure VM using the Azure Resource Manager connector, Azure Virtual Machines connector and build a custom connector to enhance the functionality of the app.
Let's Get Started!
Azure Resources
We will be creating a setup to manage virtual machines. For this, we will create simple virtual machines and an app registration in the Azure Active Directory. The app registration is to use the ARM REST API to access information related to the virtual machines that is directly not available as actions from the connectors.
Virtual Machines
In the Azure portal, select a subscription and then a resource group and create two virtual machines. You can also use an automated process from my previous post to achieve this.
App Registration
Navigate to the Azure Active Directory and then select app registrations. Create a new app registration and then in the API permissions, add a permission and select Azure Service Management as shown in the image below.

Now, click on Certificates and Secrets and generate a secret that never expires and note the secret value in notepad (this will be used in configuring the authentication tab of the custom connector.)
Custom Connector
The current Azure resource manager and the Azure virtual machines connectors do not provide with the actions or capabilities to get the current state and the CPU utilization of the virtual machine. We will create a custom connector to get that information from the REST API from a control in Power Apps.
Step 1: Log on to make.powerapps.com and navigate to Data -> Custom Connectors from the left navigation bar. Click on New Custom Connector and then select Create from blank.
Step 2: In the General Information tab, provide the logo, description etc. for the custom connector. In the Scheme, select HTTPS and provide the URI: management.azure.com for the Host field.
Authentication:
In the previous section, we created an app registration and we will use the same for configuring the authentication for the custom connector.
Step 1: Select OAuth 2.0 as type and then select Azure Active Directory in the Identity provider.
Step 2: From the app registration in the Azure Active Directory, copy over the Client ID and Secret and provide those values. Do not change the Login URL and the Tenant ID. For the Resource URL, provide: https://management.azure.com
Step 3: Copy the re-direct URL generated and paste it in the Redirect URIs section under the Authentication tab on the App registration in the Azure Active Directory.

Definition 1: GetVMStatus
Step 1: Name the definition and provide a description and set the operation name. In the request, click on Import from Sample and select the type as GET. Use the string: https://management.azure.com/subscriptions/{subscriptionId}/resourceGroups/{rgName}/providers/Microsoft.Compute/virtualMachines/{vmName}/InstanceView for the URI. Click on create connector and move to test.
Step 2: Create a connection and provide all the values for the parameters and test the connector definition. Check for status 200 and copy over all the content from response body, navigate to the definition page and update the default response by providing the output from the test. Note that this step is very important to appropriately configure the expressions in the canvas app.
Definition 2: GetCPUUsage
Step 1: Name the definition and provide a description and set the operation name. In the request, click on Import from Sample and select the type as GET. Use the string: https://management.azure.com/subscriptions/{subId}/resourceGroups/{rgName}/providers/Microsoft.Compute/virtualMachines/{vmName}/providers/microsoft.insights/metrics for the URI. Click on create connector and move to test.
Step 2: Create a connection and provide all the values for the parameters and test the connector definition. Check for status 200 and copy over all the content from response body, navigate to the definition page and update the default response by providing the output from the test. Note that this step is very important to appropriately configure the expressions in the canvas app.
Power Apps
Once the custom connector is created and tested, navigate to https://make.powerapps.com to start creating the app. We will create a blank app of tablet layout for this example. Select the blank app and then on the once the power apps studio loads, select the template of your choice. We will be using the Azure Resource Manager, Azure VM and the Azure Custom VM (the custom connector we created in the previous section) for this app and so create the connections to these connectors in the app.
Before moving further, we will also be using the "IfError" function and for this function to work appropriately, make the following change in the app settings.

Once, the connections are created and the appropriate settings are changed, follow the below steps.
Step 1: This is a combo-box control to list all Azure subscriptions the current logged in user has access to.
Expression used on the Items property of this control is: AzureResourceManager.SubscriptionsList().value
Explanation: Using the Azure Resource Manager, invoke the List Subscriptions action to get all subscriptions the current logged in user can access.
Step 2: This is a combo-box control to list all resource groups from the subscription selected in the previous control.
Expression used on the Items property of this control is: AzureResourceManager.ResourceGroupsList(ComboBox1.Selected.subscriptionId).value
Explanation: Using the Azure Resource Manager, invoke the List Resource Groups action to get all resource groups from the subscription selected in the combo box from step 1.
Note: In the current configuration, the combo-box controls have been set to allow selection of 1 item only. This can be further customized by using collections to collect all the resource groups from the subscriptions selected and then all the resources in the resource groups.
Step 3: This is a gallery control to display only virtual machines from the selected resource group.
Expression used on the Items property of this control is:
Filter(
AzureResourceManager.ResourceGroupsListResources(
ComboBox1.Selected.subscriptionId,
ComboBox2.Selected.name
).value,
type = "Microsoft.Compute/virtualMachines"
)
Explanation: Filter all the resources from the Resource Group List Resources action to get resources of type Microsoft.Compute/virtualMachines only.
Expression used on the OnSelect property of the gallery control is:
Set(cpPct,First(First(First(AzureCustomVM.GetCPUUsage (ComboBox1.Selected.subscriptionId,ComboBox2.Selected.name,Gallery1.Selected.name,{'api-version':"2019-07-01"}).value).timeseries).data).average); Set(vmState,Last(AzureCustomVM.GetVMStatus(ComboBox1.Selected.subscriptionId,ComboBox2.Selected.name,Gallery1.Selected.name,{'api-version':"2020-06-01"}).statuses).displayStatus)
Explanation: Two variables are being set here to get the CPU percentage and the current state of the virtual machine. Here, we are using the custom connector actions to get the data from the virtual machine.
Hidden Control: There is also a timer control on the app that updates the CPU percentage variable and the Virtual machine state variable every 5 seconds.
Timer Configuration:
OnTimerStart: Set(cpPct, First(First(First(AzureCustomVM.GetCPUUsage (ComboBox1.Selected.subscriptionId,ComboBox2.Selected.name,Gallery1.Selected.name,{'api-version':"2019-07-01"}).value).timeseries).data).average); Set(vmState, Last(AzureCustomVM.GetVMStatus(ComboBox1.Selected.subscriptionId,ComboBox2.Selected.name,Gallery1.Selected.name,{'api-version':"2020-06-01"}).statuses).displayStatus)
Explanation: Set the CPU percentage and the VM state variables with the latest data.
Repeat: True
Auto Start: True
Step 4: This is a label control to display the current CPU consumption of the VM based on the value set by the other controls.
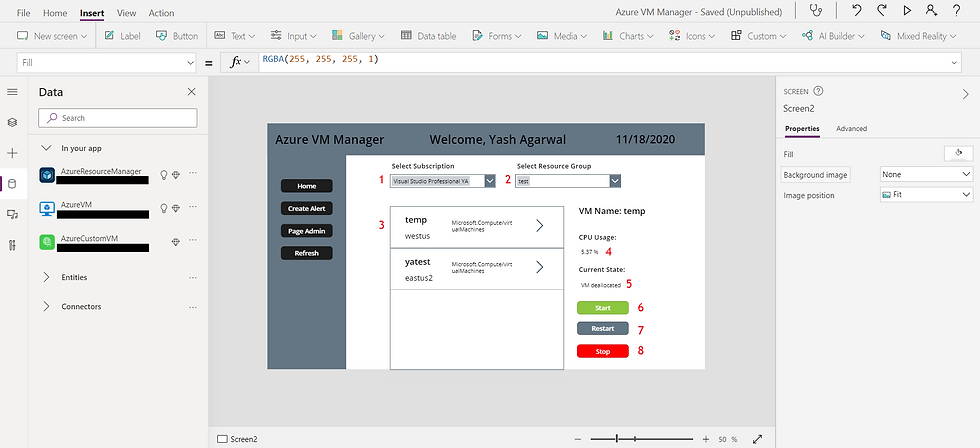
Step 5: This is a label control to display the current state of the VM based on the value set by the other controls.
Step 6: This is a button control to perform the Start action on the selected virtual machine. Expression used on the OnSelect property of this control is:
IfError(AzureVM.VirtualMachineStart(ComboBox1.Selected.subscriptionId,ComboBox2.Selected.name,Gallery1.Selected.name),Notify("Error starting Virtual Machine" & ErrorInfo.Message,NotificationType.Error));Set(vmState, AzureVM.VirtualMachineGet(ComboBox1.Selected.subscriptionId,ComboBox2.Selected.name,Gallery1.Selected.name).properties.provisioningState)
Explanation: Use the Azure VM connector and the Virtual Machine Start action to start the selected virtual machine. The subscription ID, resource group name etc. are passed from the selected controls and the API version is hard coded in the expression. If the action fails, the user is notified with an error message. The virtual machine state is set to the latest state after the action has been initiated.
Step 7: This is a button control to perform the Restart action on the selected virtual machine. Expression used on the OnSelect property of this control is:
IfError(AzureVM.VirtualMachineRestart(ComboBox1.Selected.subscriptionId,ComboBox2.Selected.name,Gallery1.Selected.name),Notify("Error restarting Virtual Machine" & ErrorInfo.Message,NotificationType.Error));Set(vmState, AzureVM.VirtualMachineGet(ComboBox1.Selected.subscriptionId,ComboBox2.Selected.name,Gallery1.Selected.name).properties.provisioningState)
Explanation: Use the Azure VM connector and the Virtual Machine Restart action to restart the selected virtual machine. The subscription ID, resource group name etc. are passed from the selected controls and the API version is hard coded in the expression. If the action fails, the user is notified with an error message. The virtual machine state is set to the latest state after the action has been initiated.
Step 8: This is a button control to perform the Stop action on the selected virtual machine. Expression used on the OnSelect property of this control is:
IfError(AzureVM.VirtualMachineDeallocate(ComboBox1.Selected.subscriptionId,ComboBox2.Selected.name,Gallery1.Selected.name),Notify("Error stopping Virtual Machine" & ErrorInfo.Message,NotificationType.Error));Set(vmState, AzureVM.VirtualMachineGet(ComboBox1.Selected.subscriptionId,ComboBox2.Selected.name,Gallery1.Selected.name).properties.provisioningState)
Explanation: Use the Azure VM connector and the Virtual Machine Deallocate action to stop the selected virtual machine. The subscription ID, resource group name etc. are passed from the selected controls and the API version is hard coded in the expression. If the action fails, the user is notified with an error message. The virtual machine state is set to the latest state after the action has been initiated.
Setup in Action
In this post we saw how to setup a canvas app to manage virtual machines in azure. We also created a custom connector to get more details on the virtual machine from the REST API for items that are not directly supported by the available connectors. Similar setup can be used to manage other azure resources as well. Also, the app can be further enhanced to deploy and delete resources in Azure, create service alerts based on thresholds set on the metrics, email respective groups about any anomalies, track users performing actions on the resources and etc.
I hope you found this interesting and it helped you. Thank you for reading!
Comments