
Sentiment Analysis in Power Virtual Agents using AI Builder and Power Automate
- Yash Agarwal

- Jan 8, 2020
- 3 min read
In this #PowerShot I will show you how to use the sentiment analysis capacity of the AI Builder on PowerPlatform with Power Virtual Agents.
In one of my earlier posts, we created a similar functionality using the Text Analytics service from Azure Cognitive services. In this one, lets take a look at the sentiment analysis feature from the PowerPlatform AI Builder.
Previous blog on Sentiment analysis in Power Virtual Agents using Text Analytics here.
More on AI Builder here.
Let's Get Started!
The process we are looking at is, the customer enters their concern and then that concern is sent as an input to Power Automate. We use the "Predict" action in Power Automate to get a sentiment score. Based on the sentiment score returned, we make the bot take a smart decision on how to continue with the session.
Power Automate
Step 1: Trigger: When an HTTP Request is received: This flow will be called as an action in the virtual agent and so we are using this trigger. The JSON schema is defined to accept an input from the virtual agent.
Step 2: Action: Predict: The input from the trigger is passed to this action and sentiment analysis model is used to analyse the input.

Step 4: Action: Parse Jason: To parse the JSON paylod from the above action. We need to extract the sentiment key from the JSON payload.
Use the below string as a sample input to generate the schema.
{"predictionOutput":{"result":{"sentiment":"negative","documentScores":{"positive":1.9169262941E-06,"neutral":2.352815613E-07,"negative":0.99999785423278809},"sentences":[{"sentiment":"negative","sentenceScores":{"positive":1.9169262941E-06,"neutral":2.352815613E-07,"negative":0.99999785423278809},"offset":0,"length":24}]}},"operationStatus":"Success","error":null}

Step 5: Action: Response: To send the sentiment response to the Power Virtual Agent.
Expression: body('Parse_JSON')?['predictionOutput']?['result']?['sentiment']
Power Virtual Agent
Step 1: Log on to https://powervirtualagents.microsoft.com/ and select Explore Bots -> Create a New Bot and provide a name for the bot. You can change the environment in which this bot is created by selecting the desired environment in the advanced settings.
Step 2: You will see a set of actions already added and now you can start editing the flow of the bot as per the requirement. For the scenario that we are building, add a new node and select "Ask a Question" and enter "What can I help you with today?". Identify the response as "Entire Text" and save it as "Var1".
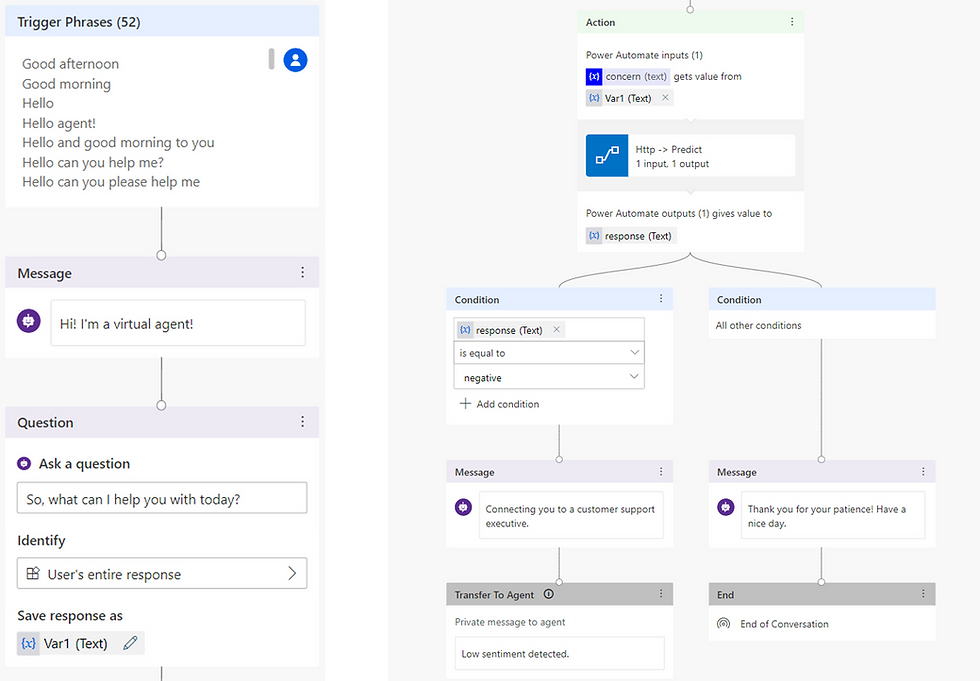
Step 3: Add a new node and select "Call an Action". From the actions select the Sentiment Analysis Flow that was created in Power Automate in the first section. For the input to the action, pass the "Var1" from Step 2. Now the Flow returns with a text response of "Negative" or "Positive" and if the response is Negative, we want to transfer the chat to an agent and if not, then end it.
Step 4: Add a new node and select "Condition". For the first branch, select the "responseSentiment" from the Flow action and select the operand as "is equal to" and then type the text "Negative". This will check if the response returned from the Flow is "Negative" and move to this branch of the Agent and if not, then move to the other branch.
If Negative sentiment is detected,
Add a new node and select "Show Message". Display a message saying that the chat is being transferred to an agent and add another node and select "Transfer to Agent". In the Transfer to Agent node, you can provide a private message to the agent.
If a normal sentiment is detected,
Add a new node and select "Show Message". Display a message with a greeting and then add another node and select "End with Survey".
Setup in Action
In this post we saw how to implement sentiment analysis for Power Virtual Agents using the sentiment analysis model from the AI Builder on PowerPlatform using Power Automate.
I hope you found this interesting and it helped you! Thank you for reading!
Comments